As time passes, more companies are migrating to, or at least evaluating, Azure SQL Database as an alternative to the high cost of running SQL Server on premises.
Checking Compatibility
 One of the first aspects of moving your database to Azure SQL Database is to check for compatibility and Microsoft gives you numerous ways to do this for Azure SQL Database V12 (hereafter referred to as just ‘V12’). One of these methods is using SQL Server Data Tools for Visual Studio (SSDT) which uses the most recent compatibility rules to detect V12 incompatibilities. In SSDT you can import your database schema and build a project for a V12 deployment, and if any incompatibilities are found, they can be corrected within SSDT and then synchronized back to the source database.
You can also use a command-line tool called SqlPackage that can generate a report of compatibility issues (and always make sure you have the latest version). SQL Server Management Studio is another way of doing it, using the Export Data-tier Application feature, which can detect and report errors to the screen. If no errors are detected, you can then migrate your database to V12. If incompatibilities are detected, they can be corrected using SSMS prior to migration.
Data Migration Assistant is a stand-alone tool (easily confused with the SQL Server Migration Assistant) that can be used to help reduce the effort to upgrade, and replaces the SQL Server 2016 Upgrade Advisor Preview. DMA can also recommend performance and reliability improvements. Another tool, SQL Azure Migration Wizard (SAMW), is a Codeplex tool that uses Azure SQL Database V11 compatibility rules to detect V12 incompatibilities. SAMW can also complete the migration to V12 and fix some compatibility issues. Something to be aware of when using SAMW is that it can detect incompatibilities that don’t need to be fixed.
Migrating Data
Once your database has passed the compatibility check, you have to determine the best method to migrate. Some of the more common methods include using the SSMS Migration Wizard, exporting to a BACPAC, using transactional replication, or manually scripting the databases and inserting your data.
Using the SSMS Migration Wizard is great for SQL Server 2005 and up databases that are small to medium size. You can activate this wizard in SSMS 2016, by right clicking on a database, choose Tasks, and then Deploy Database to Microsoft Azure SQL Database. In SSMS 2014 it’s called Deploy Database to Windows Azure SQL Database. Using this wizard allows you to specify the database to migrate, connect to your Azure subscription, chose the location for the .bacpac file, the new database name, and which tier to migrate to. When you click finish, the wizard will extract and validate the schema and then export the data. Once the data is exported, it will create a deployment plan and begin importing the data into the new V12 database.
 Very similar to the SSMS Migration Wizard is the Export Data-tier Application. To select this option, right click on the database, chose Tasks, and then Export Data-tier Application. In the export settings you specify where you would like to create the .bacpac file. You can save this locally, or save it directly to your Azure storage account. There is also an advanced tab where you can select which tables to include. This is helpful if your local database contains copies of tables that you don’t wish to migrate to V12. When you chose Finish, it will export your data. You can then connect to your Azure server through SSMS and chose to Import Data-tier Application. You will specify the location of the file, the database name and tier of the Azure SQL Database. When you chose finish, the database will begin importing. This method gives you slightly more control over the process since it separates the export from the import. It also gives you the option of storing the .bacpac file in your Azure storage account so that the more vulnerable import process won’t be dependent on your internet connection.
An option when using either the SSMS Migration Wizard or the Export Data-tier Application, is to create an Azure VM with SQL Server and set up log shipping. This will pre-stage your database in the Azure cloud to help minimize the import time of the database. When it comes time to do the migration, you just restore the final log backups on the secondary and then remove log shipping. To bring the database online, perform a restore with recovery. This will essentially eliminate the time it takes to copy your database from your data center into the Azure data center.
Transactional replication is another method to help reduce the downtime of migrating to V12. It’s the best option if you have an extremely small maintenance window to switch over to V12, if the database can support transactional replication. Setting up transactional replication requires primary keys for each published table, which can be problematic for a lot of databases. Configuring transactional replication can also be complicated, as you have to set up the distribution database, set up the publisher and subscriber, and monitor jobs.
 You can also manually migrate by using the Generate Scripts wizard and scripting out the database schema and/or data. You can then create an empty database in Azure and import your schema and or data, by executing the script. I have heard of some people using this method to create the empty database and then manually inserting their data one table at a time using SSMS and a linked server. This method may work for you, but it can also be very complicated if you have a lot of schema constructs like foreign key relationships and identity columns, in which case the other methods above would be more reliable and efficient.
Other Migration Considerations
When planning to migrate on premises databases to V12, the size of the database is a huge factor in how long the migration will take. The export of the database, the transfer of the data, and the import will all increase in proportion to the size of the database.
Another big factor in the restore/import time when moving your databases to V12 is the performance tier you are restoring too. The restore/import process requires a lot of horsepower, so to help expedite your migration, you should consider restoring to a higher performance tier. When the database is online, you can easily and quickly drop down to a lesser tier that meets your daily performance needs. Being able to change performance tiers with a few mouse clicks is one of the big benefits of Azure SQL Database.
Monitoring
An important part of administering any database is monitoring. If you are not monitoring something, you cannot measure it. If you don’t know what your metrics are when things are working normally, how will you know which things are worse when performance is degraded? With on premises databases, we have tools that we are familiar with: SQL Server Management Studio, Performance Monitor, Task Manager, DMVs, and so on. When we move our databases to V12, we lose the ability to monitor from an OS perspective, and other concepts change a bit too. We now have this metric called DTU to work with, which stands for Database Transaction Units. Think of it as a combination of CPU, data and transaction log I/O, and memory. The Azure Portal includes a monitoring chart that defaults to having DTU percentage checked, and you can edit this chart to include additional metrics, such as:
- Blocked by Firewall
- CPU %
- DTU limit
- DTU used
- Data I/O %
- Database size %
- Deadlocks
- Failed Connections
- In-Memory OLTP storage %
(preview)
- Log I/O %
- Sessions %
- Successful Connections
- Total database size
- Workers %
At a minimum, I would add CPU percentage, data I/O percentage, deadlocks, and database size percentage. Currently, this chart displays the previous hour of resource utilization.
Monitoring by DMVs has not changed much, other than having a few new DMVs related for individual database metrics and how to calculate database size. One of my previous articles here, Getting Started Tuning Performance in Azure SQL Database, covers some of the differences in the common scripts that are used for gathering disk latencies and wait stats in relation to Azure SQL Database.
Third-party tools have also started including hooks into Azure SQL Database, such as SentryOne with DB Sentry. DB Sentry gives you the ability to monitor performance and manage events that are occurring in your system. One cool feature is the Top SQL function that allows you to see the queries that have the most impact on your overall performance so you can tune/fix any issues with that query. Another is charting DTU over time and visualizing that on a dashboard alongside other important metrics.
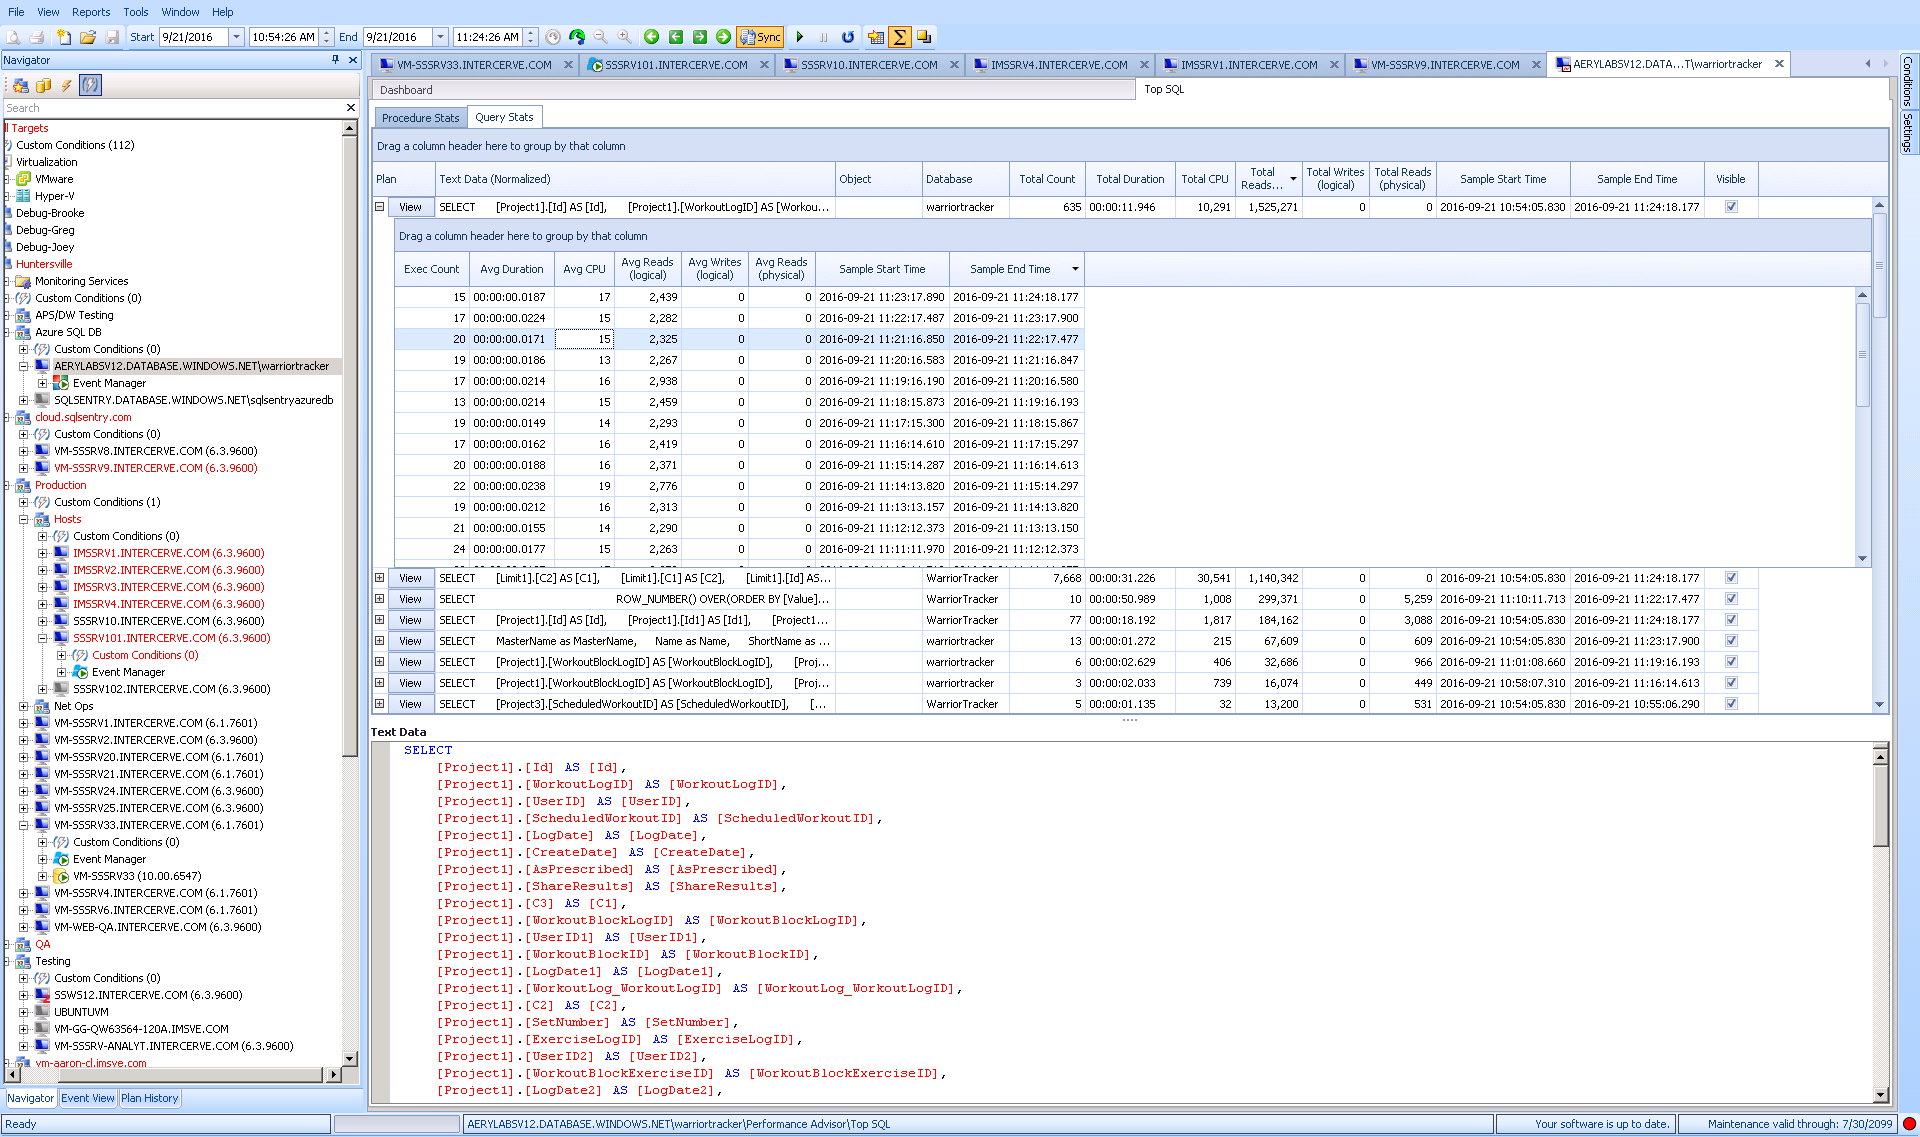 Top SQL in the SentryOne client |
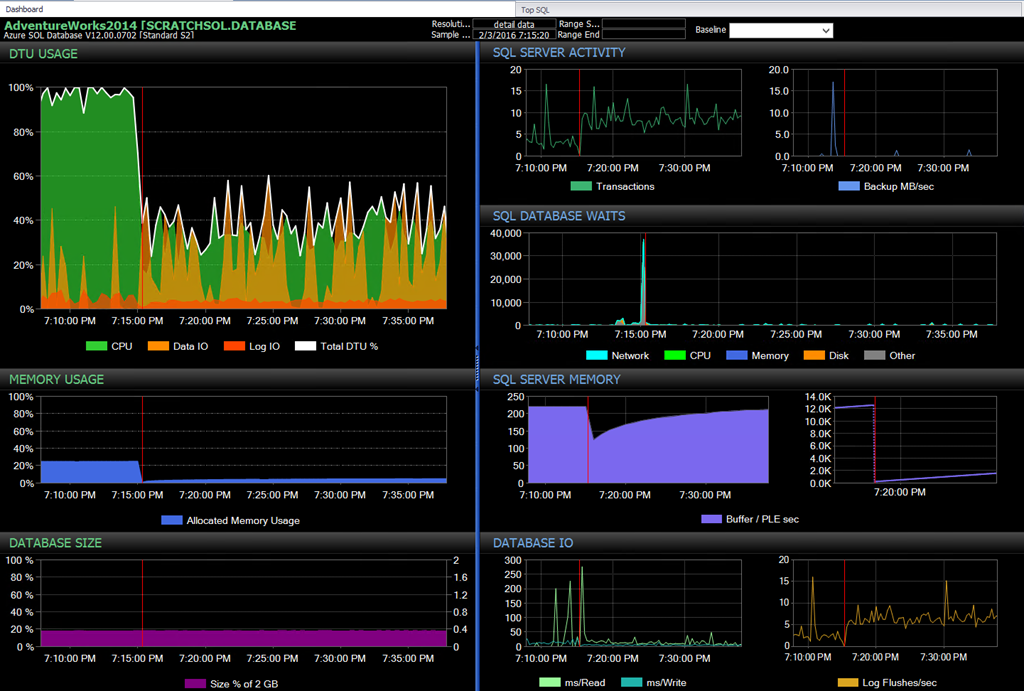 DTU Usage on the DB Sentry Dashboard |
These metrics are stored in a dedicated database, providing you the ability to baseline and to trend over performance over time, which is much better than the limited charts you currently get in the Azure Portal.
Summary
There are many benefits to migrating to Azure SQL Database V12, if your database is compatible, so take advantage of one of the available tools to check your compatibility with V12. If your database is compatible, or can be easily modified to become compatible, then you can easily migrate to Azure SQL Database V12 and begin testing and benchmarking your applications and workloads.


